PirateBox - OpenWrt sur TP-Link TL-MR3020
| Article en cours de rédaction |
|---|
La PirateBox, récupérer et déposer des fichiers par un hotspot wifi. On se connecte à la PirateBox comme à n’importe quel réseau Wifi. Seulement, au lieu d’accéder à internet, les utilisateurs sont redirigés vers une interface et invité à télécharger ou à déposer des fichiers.
Sommaire
- 1 Présentation
- 2 Coût
- 3 Niveau de difficulté
- 4 Outillage nécessaire
- 5 Composants nécessaires
- 6 Schémas
- 7 Étape par étape
- 8 Liens
- 9 Auteurs
Présentation
La PirateBox permet, via un petit routeur neuf ou de récupération, de mettre à disposition en wifi un espace de stockage en écriture ou en lecture seulement.
Les utilisateurs se connecte en wifi sur la PirateBox et peuvent prendre des fichiers. Le routeur est coupé du réseau internet. La PirateBox utilise le système d'exploitation libre OpenWrt.
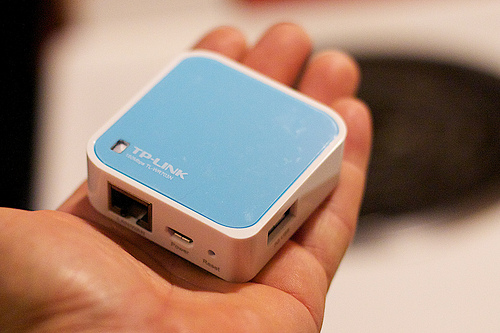
Nous vous proposons l'installation d'OpenWrt et de PirateBox sur le boîtier TP-Link TL-MR3020. Ses avantages sont sa petite taille, sa faible consommation, son faible encombrement et son prix. Il est en plus de cela plutôt bien dessiné. Voici une démonstration de la taille du boîtier.
Coût
TP-Link ≈ 30 €
Niveau de difficulté
Outillage nécessaire
- Ordinateur
- Connexion internet
Composants nécessaires
- TP-Link
- clé USB - FAT32, une seule partition
Schémas
Étape par étape
Préparer le routeur
- placer le routeur en mode WISP (Wireless Information Service Point ou Wireless Internet Service Provider selon l'usage)
- alimenter électriquement le routeur (USB)
- connecter le routeur directement à votre ordinateur à l'aide d'un câble réseau
Se connecter au routeur et mettre à jour le firmware
Il faut être sur le même réseau, pour cela :
ifconfig eth0 192.168.0.50
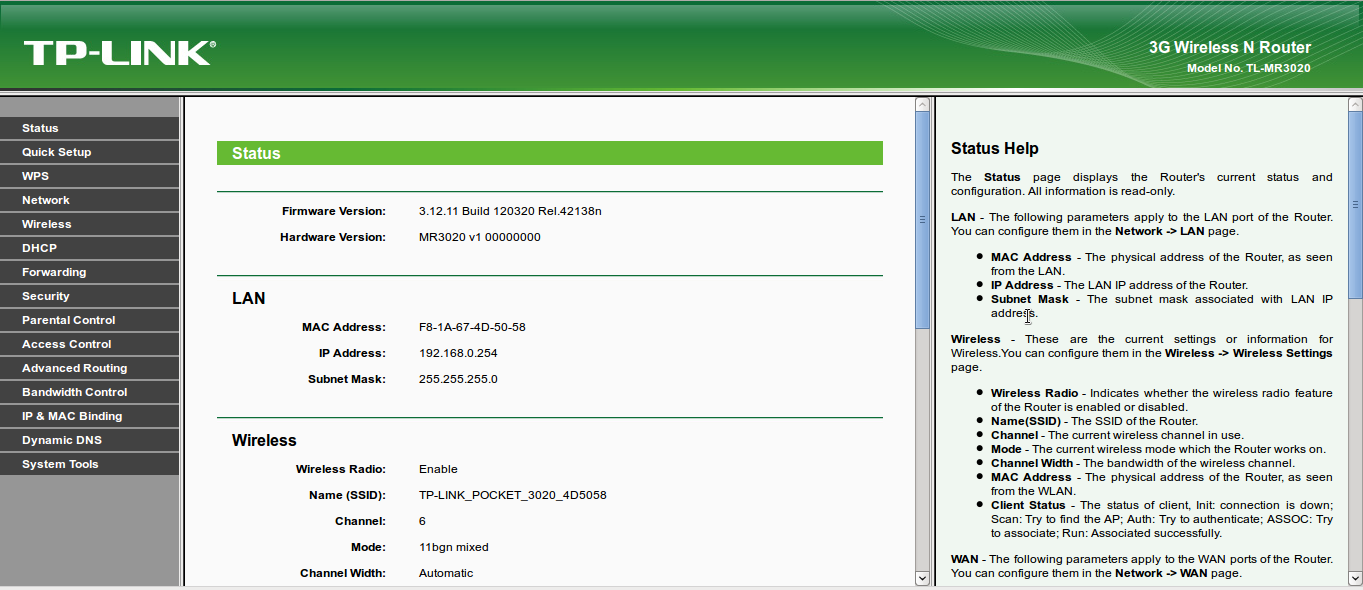
Alors on peut ouvrir un navigateur et aller sur le routeur à l'adresse suivante http://192.168.0.254
L'identifiant est : admin et le mot de passe : admin
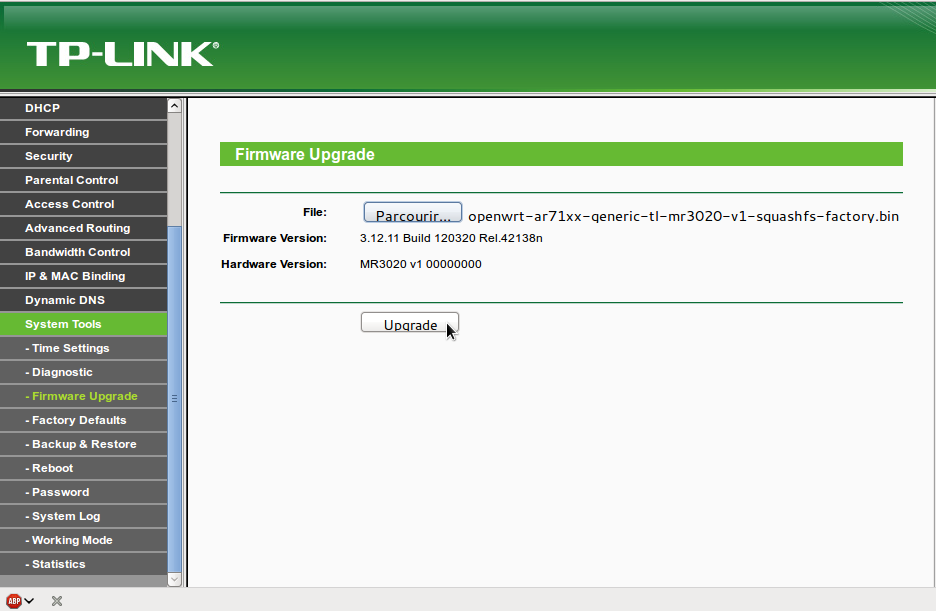
Il faut télécharger le firmware OpenWRT conçu pour le TP-Link MR3020 sur son poste de travail :
$ wget http://downloads.openwrt.org/snapshots/trunk/ar71xx/openwrt-ar71xx-generic-tl-mr3020-v1-squashfs-factory.bin
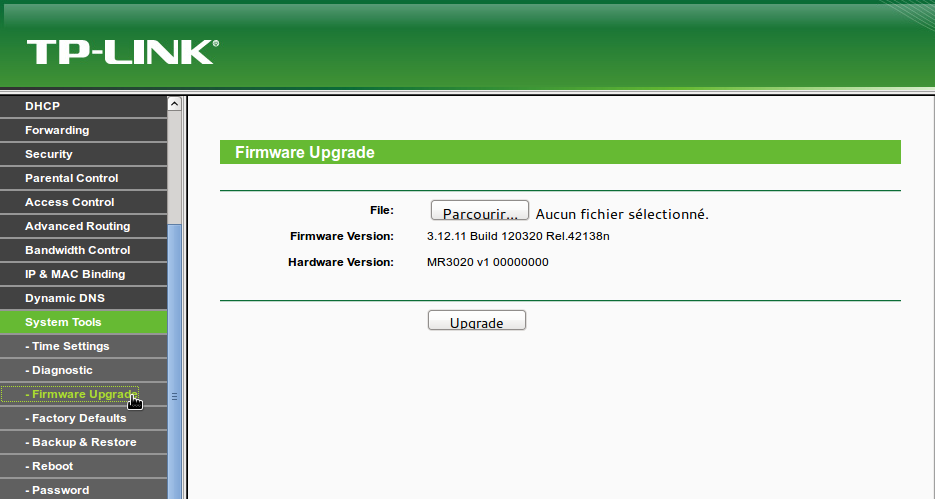
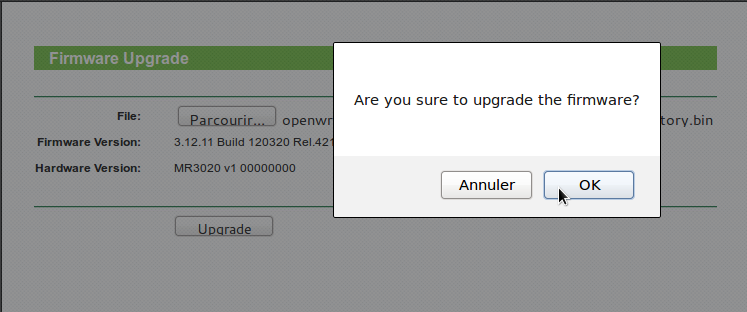
Dans l'interface du TP-Link, à l'adresse http://192.168.0.254 il faut se rendre dans System Tools > Firmware Upgrade.
Un formulaire propose d'uploader le nouveau firmware via un formulaire.
Après la mise à jour, le MR3020 redémarre et l'on perd la connexion dans le navigateur, l'installation change l'adresse IP du routeur.
Se reconnecter
Le câble relie toujours le routeur et votre ordinateur, il faut se mettre sur le même réseau que le routeur :
# ifconfig eth0 192.168.1.2
Puis on accède en telnet
# telnet 192.168.1.1
root@asus:~# telnet 192.168.1.1
Trying 192.168.1.1...
Connected to 192.168.1.1.
Escape character is '^]'.
 === IMPORTANT ============================
  Use 'passwd' to set your login password
  this will disable telnet and enable SSH
 ------------------------------------------


BusyBox v1.19.4 (2013-10-03 07:24:50 UTC) built-in shell (ash)
Enter 'help' for a list of built-in commands.

  _______                     ________        __
 |       |.-----.-----.-----.|  |  |  |.----.|  |_
 |   -   ||  _  |  -__|     ||  |  |  ||   _||   _|
 |_______||   __|_____|__|__||________||__|  |____|
          |__| W I R E L E S S   F R E E D O M
 -----------------------------------------------------
 BARRIER BREAKER (Bleeding Edge, r38294)
 -----------------------------------------------------
  * 1/2 oz Galliano         Pour all ingredients into
  * 4 oz cold Coffee        an irish coffee mug filled
  * 1 1/2 oz Dark Rum       with crushed ice. Stir.
  * 2 tsp. Creme de Cacao
 -----------------------------------------------------
root@OpenWrt:/#
Une fois connecté la première chose à faire est de changer le mot de passe, cela va activer le SSH et désactiver le telnet :
root@OpenWrt:/# passwd
Une confirmation est demandée, il faut donc saisir deux fois de suite le même mot de passe.
root@OpenWrt:/# passwd
Changing password for root
New password:
Retype password:
Password for root changed by root
root@OpenWrt:/#
Configuration du routeur
Les paramètres du réseaux vont nous permettre de se reconnecter au routeur mais non plus en telnet mais en SSH.
L'idée est que votre routeur aura accès à internet pendant que vous vous aurez accès au routeur en SSH, pour cela il faut que tout le monde soit sur le même réseau, votre réseau local.
Admettons que notre réseau local soit dans l'adressage suivant 192.168.0.x alors nous allons choisir une adresse fixe pour le routeur, non prise sur le réseau, par exemple 192.168.0.50
Il faut également connaître la passerelle de votre réseau (dans le cas le plus c'est l'adresse de votre boîtier ADSL), ici notre passerelle est 192.168.0.254
Ses paramètres vont nous servir à configurer le routeur pour y avoir accès en SSH.
On est toujours en telnet on édite le fichier /etc/config/network avec la commande vi :
root@OpenWrt:~# vi /etc/config/network
On modifie les paramètres suivants :
   option ipaddr ‘192.168.0.50‘
   option netmask ’255.255.255.0′
   option gateway ‘192.168.0.254‘
On ajoute les paramètres suivants :
   list dns ‘192.168.0.254‘
   list dns ’8.8.8.8′
Puis il faut éditer les règles de parefeu :
root@OpenWrt:~# vi /etc/config/firewall
Il faut passer les règles des 3 premières sections de REJECT à ACCEPT.
root@OpenWrt:~# vi /etc/config/firewall

config defaults
        option syn_flood        1
        option input            ACCEPT
        option output           ACCEPT
        option forward          ACCEPT
# Uncomment this line to disable ipv6 rules
#       option disable_ipv6     1

config zone
        option name             lan
        list   network          'lan'
        option input            ACCEPT
        option output           ACCEPT
        option forward          ACCEPT

config zone
        option name             wan
        list   network          'wan'
        list   network          'wan6'
        option input            ACCEPT
        option output           ACCEPT
        option forward          ACCEPT
        option masq             1
        option mtu_fix          1
[…] on ne touche pas au reste du fichier
On active maintenant le wifi en éditant le fichier /etc/config/wireless
root@OpenWrt:~# vi /etc/config/wireless
Et on passe la variable option disabled 1 à option disabled 0
option disabled 0
La configuration est terminée, on peut se déconnecter ctrl + d et on peut éteindre le routeur !
Installation de l'application PirateBox
Pour l'installation il faut que le routeur soit connecté à internet.
On branche le TP-Link et l'ordinateur sur notre réseau local.
Il faut que notre ordinateur reprenne une adresse du réseau local :
# dhclient eth0
On alimente denouveau électriquement le routeur (USB) et cette fois on se connecte en SSH :
# ssh root@192.168.0.50
Une confirmation de l’authenticité de l'hôte est demandée, il faut répondre yes.
   The authenticity of host '192.168.0.50 (192.168.0.50)' can't be established.
   RSA key fingerprint is 3c:31:f7:cb:7f:94:cb:49:b1:10:b1:ac:f1:55:90:b6.
   Are you sure you want to continue connecting (yes/no)? yes
Le mot de passe demandé ensuite est celui que nous avons redéfini plus haut avec la commande passwd.
root@machine:/home/user# ssh root@192.168.0.50
The authenticity of host '192.168.0.50 (192.168.0.50)' can't be established.
RSA key fingerprint is 3c:31:f7:cb:7f:94:cb:49:b1:10:b1:ac:f1:55:90:b6.
Are you sure you want to continue connecting (yes/no)? yes
Warning: Permanently added '192.168.0.50' (RSA) to the list of known hosts.
root@192.168.0.50's password:

BusyBox v1.19.4 (2013-10-03 07:24:50 UTC) built-in shell (ash)
Enter 'help' for a list of built-in commands.

  _______                     ________        __
 |       |.-----.-----.-----.|  |  |  |.----.|  |_
 |   -   ||  _  |  -__|     ||  |  |  ||   _||   _|
 |_______||   __|_____|__|__||________||__|  |____|
          |__| W I R E L E S S   F R E E D O M
 -----------------------------------------------------
 BARRIER BREAKER (Bleeding Edge, r38294)
 -----------------------------------------------------
  * 1/2 oz Galliano         Pour all ingredients into
  * 4 oz cold Coffee        an irish coffee mug filled
  * 1 1/2 oz Dark Rum       with crushed ice. Stir.
  * 2 tsp. Creme de Cacao
 -----------------------------------------------------
root@OpenWrt:~#
On vérifie que le routeur a bien accès à internet :
root@OpenWrt:/# ping free.fr
Si le routeur n'a pas accès vérifier vos branchements et la configuration réseau du routeur (/etc/config/network).
Il faut ajouter le support USB à notre routeur :
root@OpenWrt:~# opkg update
Downloading http://downloads.openwrt.org/snapshots/trunk/ar71xx/packages/Packages.gz.
Updated list of available packages in /var/opkg-lists/barrier_breaker.
root@OpenWrt:~#

root@OpenWrt:~# opkg install kmod-usb-uhci
Installing kmod-usb-uhci (3.10.13-1) to root...
Downloading http://downloads.openwrt.org/snapshots/trunk/ar71xx/packages/kmod-usb-uhci_3.10.13-1_ar71xx.ipk.
Configuring kmod-usb-uhci.
root@OpenWrt:~#

root@OpenWrt:~# insmod usbcore
kmod: module is already loaded - usbcore
root@OpenWrt:~#

root@OpenWrt:~# insmod uhci
kmod: missing module (null)
kmod: failed to insert (null)
root@OpenWrt:~#

root@OpenWrt:~# opkg install kmod-usb-ohci
Package kmod-usb-ohci (3.10.13-1) installed in root is up to date.
root@OpenWrt:~#

root@OpenWrt:~# insmod usb-ohci
kmod: missing module (null)
kmod: failed to insert (null)
root@OpenWrt:~#
Il se peut que certains insmod ne soient pas possible, on poursuit.
On peut maintenant connecter notre clé USB FAT 32 à notre routeur. Notre clé USB ne doit avoir qu'une seule et même partition.
Dans la fenêtre SSH toujours ouverte, on installe l'application PirateBox :
   root@OpenWrt:~# cd /tmp
   root@OpenWrt:/tmp# opkg install http://piratebox.aod-rpg.de/piratebox_0.6.3_all.ipk
root@OpenWRT:/tmp# opkg install http://piratebox.aod-rpg.de/piratebox_0.6.3_all.ipk
Downloading http://piratebox.aod-rpg.de/piratebox_0.6.3_all.ipk.
Installing piratebox (0.6.3) to root...
Configuring piratebox.
Command failed: Not found
/etc/init.d/piratebox: Mounting external USB storage...
/etc/init.d/piratebox: Creating swapspace...
32+0 records in
32+0 records out
Setting up swapspace version 1, size = 33550336 bytes
/etc/init.d/piratebox: Creating ext loop image...
/etc/init.d/piratebox: Creating piratebox loop image...
No PirateBox Image file found... loading from Internet
Connecting to piratebox.aod-rpg.de (87.237.121.137:80)
piratebox_ws_0.6_img 100% |*****************************************************************************************************|   174k  0:00:00 ETA
Check for WAN Connection ..
PING google.com (173.194.45.40): 56 data bytes
64 bytes from 173.194.45.40: seq=0 ttl=54 time=74.686 ms
64 bytes from 173.194.45.40: seq=1 ttl=54 time=74.924 ms
64 bytes from 173.194.45.40: seq=2 ttl=54 time=78.508 ms

--- google.com ping statistics ---
3 packets transmitted, 3 packets received, 0% packet loss
round-trip min/avg/max = 74.686/76.039/78.508 ms
Installing python from repository
Downloading http://downloads.openwrt.org/snapshots/trunk/ar71xx/packages/Packages.gz.
Updated list of available packages in /var/opkg-lists/barrier_breaker.
Installing python (2.7.3-2) to piratebox...
Downloading http://downloads.openwrt.org/snapshots/trunk/ar71xx/packages/python_2.7.3-2_ar71xx.ipk.
Installing libpthread (0.9.33.2-1) to piratebox...
Downloading http://downloads.openwrt.org/snapshots/trunk/ar71xx/packages/libpthread_0.9.33.2-1_ar71xx.ipk.
Installing zlib (1.2.8-1) to piratebox...
Downloading http://downloads.openwrt.org/snapshots/trunk/ar71xx/packages/zlib_1.2.8-1_ar71xx.ipk.
Installing libffi (3.0.11-1) to piratebox...
Downloading http://downloads.openwrt.org/snapshots/trunk/ar71xx/packages/libffi_3.0.11-1_ar71xx.ipk.
Installing python-mini (2.7.3-2) to piratebox...
Downloading http://downloads.openwrt.org/snapshots/trunk/ar71xx/packages/python-mini_2.7.3-2_ar71xx.ipk.
Configuring libpthread.
Configuring zlib.
Configuring libffi.
Configuring python-mini.
Configuring python.
Installing lighttpd (1.4.30-2) to piratebox...
Downloading http://downloads.openwrt.org/snapshots/trunk/ar71xx/packages/lighttpd_1.4.30-2_ar71xx.ipk.
Installing libopenssl (1.0.1e-2) to piratebox...
Downloading http://downloads.openwrt.org/snapshots/trunk/ar71xx/packages/libopenssl_1.0.1e-2_ar71xx.ipk.
Installing libpcre (8.11-2) to piratebox...
Downloading http://downloads.openwrt.org/snapshots/trunk/ar71xx/packages/libpcre_8.11-2_ar71xx.ipk.
Configuring libpcre.
Configuring libopenssl.
Configuring lighttpd.
Installing lighttpd-mod-cgi (1.4.30-2) to piratebox...
Downloading http://downloads.openwrt.org/snapshots/trunk/ar71xx/packages/lighttpd-mod-cgi_1.4.30-2_ar71xx.ipk.
Configuring lighttpd-mod-cgi.
Installing lighttpd-mod-redirect (1.4.30-2) to piratebox...
Downloading http://downloads.openwrt.org/snapshots/trunk/ar71xx/packages/lighttpd-mod-redirect_1.4.30-2_ar71xx.ipk.
Configuring lighttpd-mod-redirect.
Installing lighttpd-mod-alias (1.4.30-2) to piratebox...
Downloading http://downloads.openwrt.org/snapshots/trunk/ar71xx/packages/lighttpd-mod-alias_1.4.30-2_ar71xx.ipk.
Configuring lighttpd-mod-alias.
Installing lighttpd-mod-setenv (1.4.30-2) to piratebox...
Downloading http://downloads.openwrt.org/snapshots/trunk/ar71xx/packages/lighttpd-mod-setenv_1.4.30-2_ar71xx.ipk.
Configuring lighttpd-mod-setenv.
Installing lighttpd-mod-webdav (1.4.30-2) to piratebox...
Downloading http://downloads.openwrt.org/snapshots/trunk/ar71xx/packages/lighttpd-mod-webdav_1.4.30-2_ar71xx.ipk.
Installing libsqlite3 (3071201-1) to piratebox...
Downloading http://downloads.openwrt.org/snapshots/trunk/ar71xx/packages/libsqlite3_3071201-1_ar71xx.ipk.
Installing libuuid (2.21.2-2) to piratebox...
Downloading http://downloads.openwrt.org/snapshots/trunk/ar71xx/packages/libuuid_2.21.2-2_ar71xx.ipk.
Installing libxml2 (2.7.8-2) to piratebox...
Downloading http://downloads.openwrt.org/snapshots/trunk/ar71xx/packages/libxml2_2.7.8-2_ar71xx.ipk.
Configuring libxml2.
Configuring libuuid.
Configuring libsqlite3.
Configuring lighttpd-mod-webdav.
ln: /usr/bin/python: File exists
ln: /usr/sbin/lighttpd: File exists
Warning: Unable to locate ipset utility, disabling ipset support
Warning: Section @zone[1] (wan) cannot resolve device of network 'wan'
Warning: Section @zone[1] (wan) cannot resolve device of network 'wan6'
Warning: Section @zone[1] (wan) has no device, network, subnet or extra options
 * Flushing IPv4 filter table
 * Flushing IPv4 nat table
 * Flushing IPv4 mangle table
 * Flushing IPv4 raw table
 * Flushing IPv6 filter table
 * Flushing IPv6 mangle table
 * Flushing IPv6 raw table
 * Flushing conntrack table ...
 * Populating IPv4 filter table
   * Zone 'lan'
   * Zone 'wan'
   * Rule 'Allow-DHCP-Renew'
   * Rule 'Allow-Ping'
   * Forward 'lan' -> 'wan'
 * Populating IPv4 nat table
   * Zone 'lan'
   * Zone 'wan'
 * Populating IPv4 mangle table
   * Zone 'lan'
   * Zone 'wan'
 * Populating IPv4 raw table
   * Zone 'lan'
   * Zone 'wan'
 * Populating IPv6 filter table
   * Zone 'lan'
   * Zone 'wan'
   * Rule 'Allow-DHCPv6'
   * Rule 'Allow-ICMPv6-Input'
   * Rule 'Allow-ICMPv6-Forward'
   * Forward 'lan' -> 'wan'
 * Populating IPv6 mangle table
   * Zone 'lan'
   * Zone 'wan'
 * Populating IPv6 raw table
   * Zone 'lan'
   * Zone 'wan'
 * Set tcp_ecn to off
 * Set tcp_syncookies to on
 * Set tcp_window_scaling to on
 * Running script '/etc/firewall.user'
Command failed: Not found
Configuration file: /var/run/hostapd-phy0.conf
Using interface wlan0 with hwaddr f8:1a:67:4d:50:58 and ssid "PirateBox - Share Freely"
-------------- Initialize PirateBoxScripts -----------
chown: /opt/piratebox/share: Operation not permitted
Starting script piratebox
Generating hosts file ....
Generating dnsmasq.conf .....
Generating Environment-config for ligttpd .....
Empty tmp folder
rm: /opt/piratebox/tmp: is a directory
Starting dnsmasq...
0
Starting droopy...
0
Generated HTML-Shoutbox File.
Starting lighttpd...
0

PirateBox wireless SSID: PirateBox - Share Freely
PirateBox DNS and hostname: piratebox.lan
  hostname with unique suffix is:  EVlZQwpy.piratebox.lan
PirateBox LAN IP address: 192.168.1.1
PirateBox shared directory: /mnt/usb/PirateBox/Shared

Setup complete, PirateBox started.
You can remove the WAN connection now.
Please reboot your PirateBox now:
   # reboot
root@OpenWRT:/tmp#
On débranche le câble réseau et on redémarre :
root@OpenWRT:/tmp# reboot
L'installation de la PirateBox est maintenant terminée !
Supprimer PirateBox
Brancher la PirateBox par câble ethernet et se connecter en SSH.
Il faut arrêter le service :
# /etc/init.d/piratebox stop
Puis désinstallé le paquet :
# opkg remove piratebox
root@ikSRXQUX:~# opkg remove piratebox
Removing package piratebox from root...
/etc/rc.common: line 139: /opt/piratebox/init.d/piratebox_router: not found
Resetting OpenWRT config to factory state...
uci: Entry not found
uci: Entry not found
rmdir: '/mnt/ext': Directory not empty
Please reboot for changes to take effect.
Il faut redémarrer le routeur pour que cela prenne effet.
Réinstallation du firmware d'origine
Connecter le TP-Link au réseau locale ou brancher le cable directement sur le routeur.
Configurer votre ordinateur pour être sur le même réseau :
# ifconfig eth0 192.168.1.2
Connexion au routeur en SSH :
# ssh root@192.168.1.1
On édite le fichier de configuration réseau pour avoir accès à internet depuis le routeur :
root@4hB7NtLb:~# vi /etc/config/network
On vérifie et change les paramètres :
   option ipaddr '192.168.0.50'
   option gateway '192.168.0.254'
On débranche l'alimentation USB du routeur
Si la connexion réseau était directe entre le PC et le routeur il faut les remettre tous les deux sur le réseau local.
Puis on rebranche l'alimentation USB du routeur.
On se connecte en SSH sur le routeur :
root@asus:/home/user# ssh root@192.168.0.50
Si vous n'avez pas désinstaller PirateBox il faut que le routeur puisse aller sur internet il faut arrêter le service piratebox :
root@m5c6OCzc:~# /etc/init.d/piratebox stop
On test la connexion réseau :
root@4hB7NtLb:~# ping free.fr
On installe unzip s'il n'y est pas :
root@4hB7NtLb:~# opkg update && opkg install unzip
root@m5c6OCzc:~# opkg update && opkg install unzip
Downloading http://downloads.openwrt.org/snapshots/trunk/ar71xx/packages/Packages.gz.
Updated list of available packages in /var/opkg-lists/barrier_breaker.
Installing unzip (5.52-1) to root...
Downloading http://downloads.openwrt.org/snapshots/trunk/ar71xx/packages/unzip_5.52-1_ar71xx.ipk.
Configuring unzip.
root@m5c6OCzc:~#
root@m5c6OCzc:~# cd /tmp On télécharge le firmware :
root@m5c6OCzc:~# wget http://www.tp-link.com/Resources/software/TL-MR3020_V1_120320.zip
Une altérnative consiste à télécharger le firmware sur l'ordinateur et à le copier sur le routeur avec scp :
root@/home/user:# scp TL-MR3020_V1_120320.zip root@192.168.0.50:/tmp
On dézippe l'archive :
root@m5c6OCzc:~# unzip TL-MR3020*.zip
On installe le firmware :
root@m5c6OCzc:~# mtd -r write mr3020*up*.bin firmware
Unlocking firmware ...

Writing from mr3020nv1_en_3_12_11_up(120320).bin to firmware ...  [w]
[…] on patiente
Writing from mr3020nv1_en_3_12_11_up(120320).bin to firmware ...
Rebooting ...
On rebranche le routeur en direct sur le PC pour ne pas avoir d'interférence avec la box. Dans un navigateur saisir l'adresse : http://192.168.0.254 Le firmware est celui d'origine.
Ajouter des documents
Il est bien sûr possible d'ajouter des documents en se connectant au réseau wifi de la PirateBox.
Les fichiers peuvent également être copiés directement sur la clé USB dans le dossier PirateBox/Shared.
Personnalisation
Personnalisation du SSID
On souhaite que le SSID soit plus parlant
   # ifconfig eth0 192.168.1.2
   # ssh root@192.168.1.1
On édite la configuration wifi
root@EVlZQwpy:~# vi /etc/config/wireless
On change le ligne qui concerne le SSID
option ssid 'PirateBox - fablab'
On enregistre et on quitte. On quitte la connexion SSH :
root@EVlZQwpy:~# exit
Personnalisation du canal wifi
Certains appareil ne voit pas le réseau wifi ou le réseau wifi rentre en conflit avec un autre réseau wifi, on peut donc le changer.
http://lafibre.info/wifi/quel-canal-wi-fi-choisir-pour-optimiser-son-debit/
   # ifconfig eth0 192.168.1.2
   # ssh root@192.168.1.1
On édite la configuration wifi
root@EVlZQwpy:~# vi /etc/config/wireless
On change le ligne qui concerne le canal
option channel '11'
On enregistre et on quitte. On quitte la connexion SSH :
root@EVlZQwpy:~# exit
Vous pouvez ajouter les informations manquantes !!!
Liens
Routeur sans fil N 3G/4G portable TL-MR3020
http://www.tp-link.fr/products/details/?model=TL-MR3020
Site du projet PirateBox
http://piratebox.aod-rpg.de
Tutoriel sur le blog de Nicolas Hachet
http://blog.nicolashachet.com/fonctionnement-du-web/tutoriel-installer-une-piratebox-en-images/
Tutoriel d'installation sur le site de PirateBox Lille
http://piratebox-lille.blogspot.fr/p/tutoriel-mr3020.html
TP-Link TL-MR3020 sur le site d'OpenWrt, explication sur la restauration du firmware d'origine
http://wiki.openwrt.org/toh/tp-link/tl-mr3020
PirateBox DIY – OpenWrt sur le site de David Darts, initiateur de la "Pirate Box"
(en)http://daviddarts.com/piratebox-diy-openwrt/?title=PirateBox_DIY_OpenWrt
PirateBox sur Androïd et RaspberryPi, projets et détournements de la PirateBox
http://wiki.labomedia.org/index.php/PirateBox
3 déclinaisons de la PirateBox su le site du LOG (Laboratoire Ouvert Grenoblois)
https://www.logre.eu/wiki/LogBox
PDF pour remettre le firmware d'origine
https://docs.google.com/file/d/0B29hOjS3UlFmRGZiS0pxemJKMUk/edit?pli=1
Tutos de personnalisation : reset, configuration du SSID, changement du canal et d'autres choses
http://perso.numericable.fr/piratebox/PirateBox_Lille/tutoriels.html
Explications sur le wifi et les canaux
https://lafibre.info/wifi/quel-canal-wi-fi-choisir-pour-optimiser-son-debit/
Auteurs
- Dlareg

